
User Management and Permissions in Linux: Everything you need to know
This is the third blog in the Linux Masterclass Series


Table of contents
User Management
Users and Groups
When you run a process in Linux, you always run it as the owner of that process. Whatever files we have in our system, their access and ownership are permission-dependent.
Let's say, we have two users in the same Linux system: Adam and David. Adam can never access any of the files that belong to David and vice-versa. Every user has their own Home Directory where their user-specific files are stored.
If you open the terminal and enter the command pwd, it will give you a result like /home/lenovo
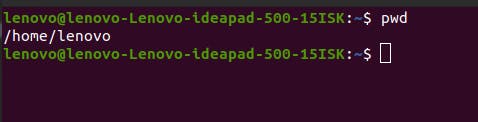
Here, lenovo is the username. If I had another user in this system named david, there would be a separate directory called /home/david. Only humans use usernames as a simpler way to identify the user.
But the Linux system uses a different way to identify a user. It stores a unique ID for every user called UID. The system also uses ‘groups’ to manage permissions. A group is a set of users with a similar set of permissions.
Imagine a scenario where you have a Linux system. Three types of employees use it in a company: 3 Web Developers, 2 DevOps Engineers, and 1 DBMS administrator. In such a situation, the admin can create groups for all categories of employees. Each group is assigned a unique GID, which helps the system identify the group.
Other Users
Even if you are the only human working with a Linux system, you are not the only user. There are other users as well, not necessarily a human. These users could be system daemons, which means processes that confirm everything runs smoothly and seamlessly in a system.
Root user
The most powerful user in the Linux system is the ‘root/superuser’. It can access any file and start/terminate any process in the entire system.
If you enter the command cat /etc/shadow in the terminal, it will show Permission denied. Because you, as a regular user, do not have sufficient permissions to view this file. If you enter ls -l /etc/shadow and check the detailed version of this file, you’ll find that this file belongs to the root user.

Sudo command
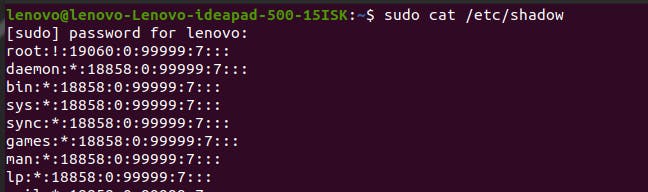
If you want to get the root access and read the /etc/shadow file, you need the help of a command known as sudo. It stands for ‘superuser do’. You can enter sudo cat /etc/shadow, and the system will ask for your password. And once you press enter after typing it, the terminal will display the file data.
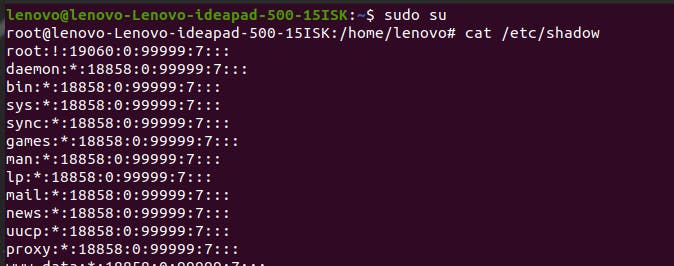
If you want to use the terminal as a root user without typing sudo, you can use the command sudo su. As you can see below, all the commands you enter now will be as the root user. You do not need to write sudo or enter the password. Whatever commands you enter as the root user after sudo su, are not registered in the history.
Warning: Making yourself the root user and using the system is not recommended because you may make critical mistakes like deleting or destroying something important and crashing your system.
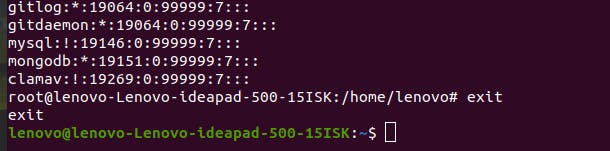
To exit the root environment, you can enter the command ‘exit’ and return to being a regular user.
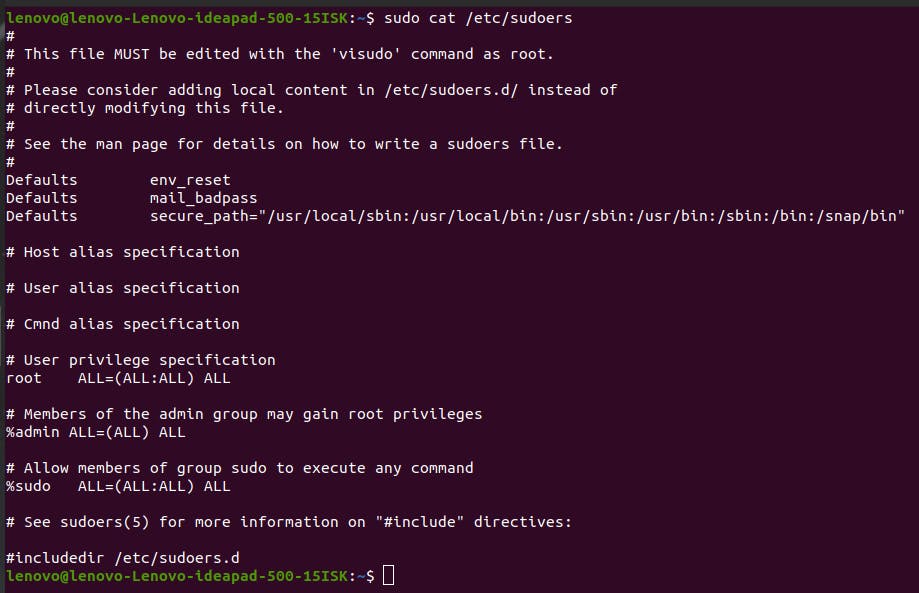
Tip: You can check the list of all users that have permission to use the
sudocommand. Linux system stores the list in a file you can read using the command ‘sudo cat /etc/sudoers’. If you want a user to have or not have access to thesudocommand, you can add or remove that user from this list.
Users other than you and sudo
As we understood earlier, there are many users in a Linux system. Two of them are you and root. Let’s talk about some others. If you enter the command sudo cat /etc/passwd, the terminal will show the list of all these users.
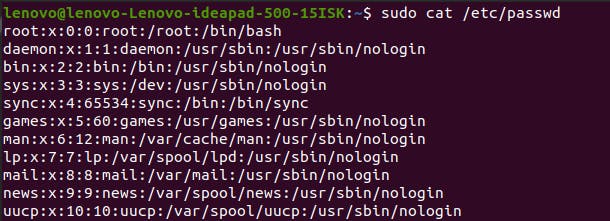
As you can see above, the users are like lenovo, daemon, mongodb, mysql etc. Each user in the list is responsible for running their specific processes. It might be different in your results for the same command.
/etc/passwd
Each line in the result of sudo cat /etc/passwd looks like this:
root:x:0:0:root:/root:/bin/bash
Each element of this line is separated by a colon. Let’s break this line down and understand all elements one by one.
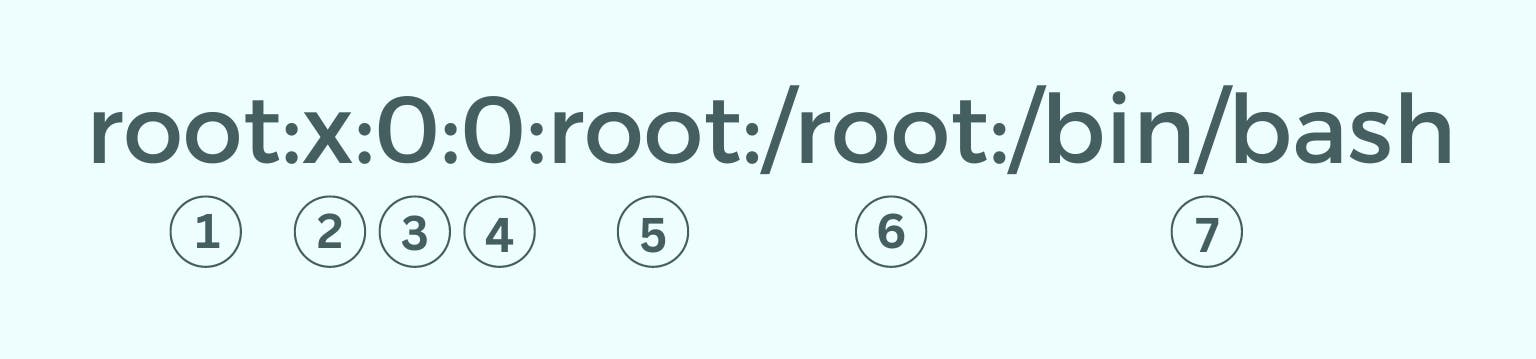
- Username - It will be different for every user. For a user named ‘lenovo’, it will be ‘lenovo’.
- Password - This is ‘x’ here because the system stores it in another file ‘/etc/shadow’.
- User ID (UID) - Every user in the system is assigned a unique user ID.
- Group ID (GID) - Every group has a unique ID assigned to them by the system.
- User info – Here it is ‘root’ based on the username. It can also be any contact detail or any other user info.
- User’s Home Directory
- Shell – Here it is root itself, but for a regular user like ‘lenovo’, it will be ‘/home/lenovo’Let’s talk about the ‘/etc/shadow’ file now.
/etc/shadow
If you enter the command sudo cat /etc/shadow, the terminal will display all users' password data.

Let’s take the first line containing the root user password details and understand each part. As you noticed, the last three values divided by a colon are empty. I'll explain them as well.
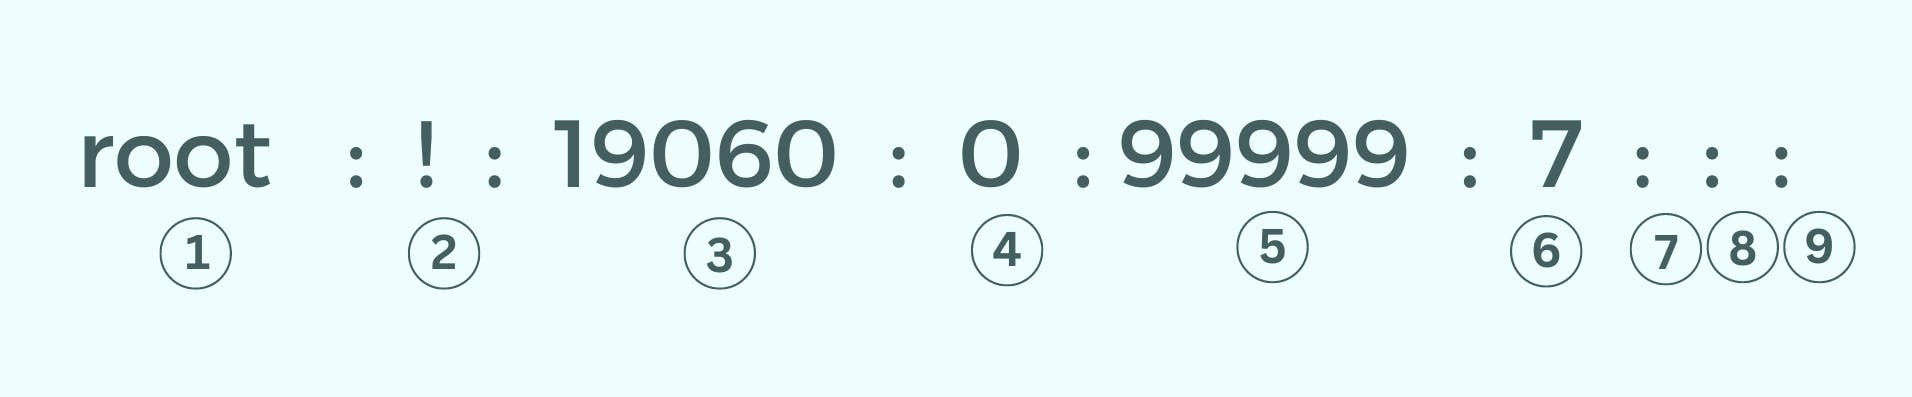
- Username
- Encrypted Password of the user – For the root user, this is ‘!’ but for a normal human user, it will be an encryption key.
- Date of last password change – This is the number of days since 1st January 1970.
- Minimum Password age – This is the number of days you have to wait to change the password. If it was 30, you would have to wait for 30 days to change the password again.
- Maximum Password Age – This is the opposite of the above one. The number of days you can keep your password, after which you have to change it.
- Warning Period – The number of days after the Max password age after which the system will start warning you to change your password.
- Password Expiry Period – The number of days passed after password expiry. It is empty because 99999 days since 1970 have not passed yet.
- Account Expiration Date – This is empty here as this is the root user. But for a regular user created in the system, its account expiration date can be customized at the time of creation.
- Reserved Field – The dev community of Linux hasn’t yet figured out what to use this field for. If they figure it out in the future, they might fill or assign it with some value. But for now, it’s just an empty reserved field.
In most distros today, the authentication does not depend only on /etc/shadow. In the modern ecosystem, there is another system known as PAM (Pluggable Authentication Module).
/etc/group
Just like the above two files are for user and their password data. This one belongs to all the groups in the Linux system. If you enter the command sudo cat /etc/group, the terminal will show the group data the same way the above two files did.
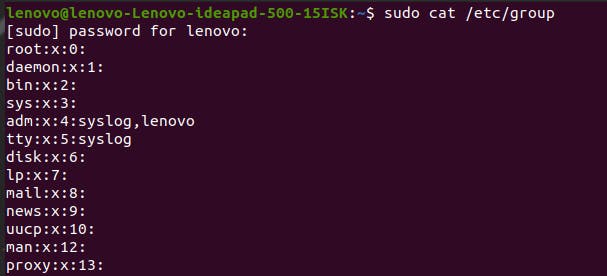
Each group’s data is stored as lines with several line elements separated by a colon. Let’s break down the first line and understand.

- Group name
- Group password – There is generally no use for a group password. But if there is, you can create one to store it here.
- GID (Group ID)
- List of users – Here, it is empty, but in some groups, there can be one or more than one user, and their names are divided by commas.
Creating, Editing and Deleting a User
Create and Delete User
If you enter the command sudo useradd david, this will create a new user named ‘david’ in your Linux system along with a new /home/david directory and new entries in /etc/shadow, /etc/passwd, and /etc/group files. When you will restart your system, it will show you two users and ask which one you want to log in to.
To delete this user, you can enter the command sudo userdel david, and it will delete/undo everything you created, like a new directory and other user file data.
Changing Password
If you want to change a user named ‘david’ password, you can do it by entering sudo passwd david. This command will help you change the password, and even edit the other details in /etc/passwd we discussed like minimum and maximum password age etc.
Changing Hostname
In the user details shown in the terminal like lenovo@lenovo-Lenovo-ideapad-500-15ISK, lenovo-Lenovo-ideapad-500-15ISK is the hostname. You can change that with the command sudo hostname [new hostname].


Once you reopen the terminal after executing the command with the desired hostname, it will display the new one as it did above. In my case, I changed it to my Twitter handle 'gaurangcodes'.
Permissions
The whole above part of the blog was all about user management. Now let’s understand permissions. If you enter ls -l, the terminal will show a detailed version of all the files with various data elements. Let’s discuss each one, especially the first one which is most important.


- Permissions
- Username – The name of the user that owns the directory.
- Group name – The group that owns the directory.
- Last time the directory was modified.
- Name of the directory
Let’s break down the first one, Permissions. Permissions always contain ten characters or bits. Divided into four types, are

- Type – It tells you what type of file this is (everything in Linux is a file, even directories/folders).
drepresents ‘directory’.-represents a ‘file’ type with .extension.lrepresents ‘Link’. - User Permissions
- Group Permissions
- Other Permissions – If any other user gets access to these files, they will have this set of permissions.
These permissions are of 4 types: r, w, x, -
- r: readability
- w: writability
- x: executability
- '-' : Empty. No permission is granted
The format in which permissions are written is always rwx: readable writable executable. r, w, and x are the symbolic representations of permissions. If any one of them is replaced by - means the user does not have that particular permission. For example, r-x means a user can read or execute the file but cannot write it.
Just like rwx, ‘u, g & o’ are symbolic representations of the user, group and others. This will come in handy for changing the permission for any of them.
Changing Permissions
The chmod command stands for change or modify. You can change the permissions for any file or directory by executing it. For example, if I create a file testing.txt in a directory, it will not have 'write' permission for other users in the system, but I can change that by executing the command chmod o+w testing.txt.
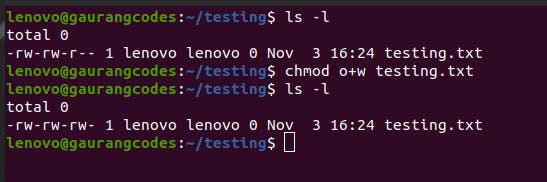
As you can see, -rw-rw-r-- changed to -rw-rw-rw-.
+ symbol is used to add permission like, o+w
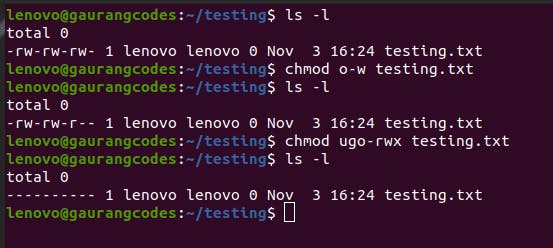
- symbol is used to remove permission like, o-w
You can also add/remove multiple permissions for multiple user types like chmod ugo-rwx testing.txt. But remember to maintain the order of ugo and rwx.
Numerical Representation of Permissions
Using ugo and rwx representations is not the only way to change permissions. As they are also represented by numbers where:
R is equivalent to 4
W is equivalent to 2
X is equivalent to 1
And
ugo (user, groups, others) can have 4+2+1 = 7 (rwx) permissions or 0+0+0 = 0 (---) permissions. Let’s say you want to give all permissions to all three u,g & o. For this, you can execute the command chmod 777 testing.txt where the order of numbers is maintained like, first for 'u', then for 'g', and last for 'o'. The permission subtotal can vary between 0 to 7 representing different combinations of permissions.
- 0 – No permission
- 1 – Execute
- 2 – Write
- 3 – Write + Execute
- 4 – Read
- 5 – Read + Execute
- 6 – Read + Write
- 7 – Read + Write + Execute
So between 0 to 7, all possible combinations of permissions covered that a user might need. But you need to maintain the order of u, g & o. In 777, the first digit is for the user, the second is for the group, and the third is for others.
chown and chgrp commands
Earlier, we saw how every file has an owner user. We can change that ownership for any file or directory by using the command sudo chown [username] [file/directory name]. chown command helps us change the ownership to any user we want.
There is also a group that owns that file or directory. You can change that by using sudo chgrp [group name] [file/directory name].
You can change both user and group ownership at the same time by using the command chown itself by using a colon to combine username and group name like, sudo chown newuser:someothergroup testing.txt.
umask command
When you create a new file or directory, it is assigned a default set of permissions for the user, group and others. You can change what default permissions they get by using the command ‘umask’ like umask 022. But this does not work like chmod. Instead, it subtracts 777 from 022 like 7-0 = 7, 7-2 = 5, 7-2 = 5. So, the set of permissions will be 755 and not 022.
suid, sgid, and sticky bit permissions
###suid
suid stands for Set UID. As we all know, a regular user does not have access to the root files. And if you try to use sudo, the terminal will ask you for the password. If you are in an office environment, you might not know it and have to call the System Admin to enter it. If there is a root file you need to execute multiple times a day, it might not be possible to call the sysadmin to enter the password. In such situations, the ‘suid’ command comes in handy.
It will help you grant r, w, or x access to root files without using sudo in future. It means you can use them as the owner. ‘suid’ can be executed using either alphabetical (ugo and rwx) representation or numerical (777) representation.
Let's understand this with an example.

If we execute ls -l /etc/shadow, you can see that this file belongs to the root user. Now let’s try to execute this file with root privileges without using sudo and entering the password.
Just like rwx represent read, write and execute permissions. s represents special root privilege. If we execute sudo chmod u+s [filename] or sudo chmod 4755 [filename]. Here, s and the first digit of 4 represent that special root privilege that you will be granted.
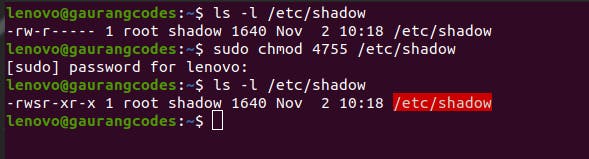
As you can see, the permissions changed to -rwsr-xr-x. This s in the user section means you can execute the file now without sudo.
But what happens if you execute sudo chmod 4655 testing.txt? The 6 here means the execute permission digit (1) is not included for the user (4655 instead of 4755).

Now the small s is not there instead it’s capital S. This means you have the owner’s permission but still cannot execute the file because you entered 6 instead of 7, which omitted the execute permission.
sgid
Just like ‘suid’, there’s ‘sgid’ as well, represented by the digit 2. If you execute sudo chmod g+s [filename] or sudo chmod 2755 [filename], it will do the same thing but for groups.
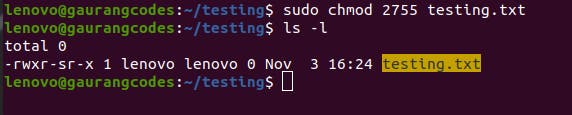
As you can see, the s has shifted and permissions have changed to -rwxr-sr-x.
Sticky bit
The Sticky bit is the permission for deletion. It means any user may read, write, or execute a file, but only the owner can delete it and nobody else. Let’s understand it in detail.
If you execute ls -ld /tmp where we’re using -ld flag instead of -l, it will show the detailed info of the directory instead of the contents inside.

Did you notice something? The last x in permissions is not there, instead is replaced by t. This t is the sticky bit.
You can do this too by using the command sudo chmod +t [directory] or sudo chmod 1755 [directory] where 1 stands for, as you might have guessed, the sticky bit.
Earlier, we learned that 4 represents readability, 2 represents writability, and 1 represents executability. But when 4, 2, or 1 are prepended to the rwx numerical representation as we saw in the above examples,
4 becomes suid
2 becomes sgid
1 becomes sticky bit
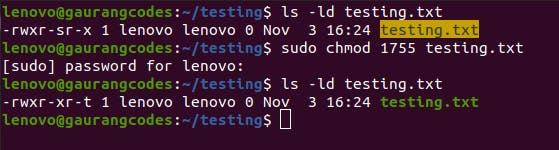
As you can see, the last x has changed to t. This means only the owner user and the root (superuser) can delete this file.
Process Permissions
Suppose you have two human users in the system, 'larry' with a UID of 600 and ‘david’ with a UID of 500. The one other user is the ‘root’ with a UID of 0.
If user ‘larry’ tries to run the command sudo passwd david to change the password of user ‘david’, will he be able to change it? The answer is no, even though ‘larry’ is using the ‘sudo’ command. Let’s understand why.
When we execute a command, it is known as a process. There are three types of UIDs associated with any process.
- Effective UID – This belongs to the owner. If ‘larry’ is running the
sudo passwd davidcommand, he is running it as a root, so the effective UID will be 0. - Real UID – This belongs to the person who has launched the process. Here it’s ‘larry’, so the Real UID will be 600.
- Saved UID – This UID switches between Effective and Real UID. Whenever you run a process, you never run it on higher privileges all the time, as you might end up messing up the system.
When you start your system, in most cases, the Effective UID and Real UID are the same because the s permission we understood earlier is not that common in the system. Most of the time, the Effective UID is the person that owns the file/directory.
Coming to the question, why can't ‘larry’ change the password of ‘david’? Because although the Effective UID is 0 (of the root) with which the process is working, the Real UID is 600 (of the person who launched the process), which is different from the UID of 500 that you’re trying to change the password of, so the system will not allow it.
But if you do it as the root user, the system will allow it because the root/superuser is very powerful and can bypass anything in the system.
Thank you for reading :)
To read the other blogs of this Linux Series, you can go to blog.gauranggaur.com
To see a video lecture of this blog, go to this youtube video
Follow me on Twitter here
Do comment your thoughts or anything unique you learned below!